SPECCY ART Help
Welcome to SpeccyArt - an online drawing experience that aims to help you create images that look as if they have been created by a Sinclair ZX Spectrum.
I regard this as beta quality, but I think it does what what it does pretty well, but don’t be surprised if there are a few hiccups along the way.
The art-working area has a grid, which indicates the attribute blocks. Remember - the Spectrum display can only have two colours per block - a foreground colour (known as “INK”), and a background colour (known as “PAPER”). It can also support a BRIGHTNESS attribute which will let you use a brighter version of the colours.
Drawing
 The drawing tool allows you to draw onto the canvas. This has a number of different functions, which can be set using the modifier pane at the bottom of the window.

The checkboxes allows you to control how the drawing tool affects the canvas. You can opt to just turn pixels on or off, set the INK colour, or set the PAPER colour, or a combination of the three. This means you could change the colours of an 8x8 cell without adding pixels to it.
The brush size can be changed using the Brush Size Tool. On brushes bigger than 1 pixel, the pattern will be used, so it is possible to paint in a dithered pattern for example.
Other tool modifiers will appear in this area, currently a slider to control the density of INK in the spray can tool.
Erasing
 The erase tool will turn OFF pixels, using the currently set brush. The INK colour and BRIGHT settings are not affected by this tool.
Drawing Shapes


 Drawing shapes such as lines and squares is fairly straightforward. Click on the tool, and then click and drag on the drawing area to drag out the shape. Release the mouse to finalise the shape. These are a bit laggy at the moment. I hope to speed it up.
When drawing circles and squares, when you release the mouse button, the shape will get a rectangle around it. You cam move this around to fine tune the position, and drag the edges and corners to fine tune the shape. Clicking on the green tick icon will draw the shape, clicking on the red cross will cancel the image.
Brush Size Tool
 This tool allows you to change the size and shape of the brush used in drawing. Clicking this icon will reveal a selection of brushes to use. This will be used both with the Drawing tool and the Eraser tool.
Spray Can Tool
 This tool will spatter a random series of pixels in the area defined by the chosen brush. A slider to adjust the density of the spatter pattern will appear at the bottom of the window.
INK Tool
 This tool allows you to select a colour to use when setting the INK of each 8x8 block on the screen when drawing or using the flood fill. This can also set the brightness of the attribute block if a bright colour is chosen.
PAPER Tool
 This tool allows you to select a colour when setting the PAPER (or background colour) of each 8x8 block on the screen when drawing or using the flood fill. This can also set the rightness if a bright colour is chosen.
When setting colours, you have to be aware of the distinction between INK and PAPER. For example, if you choose a white INK and draw on a white PAPER area, you are still setting pixels to a state of ON, even if it’s not obvious when working.
BRIGHTNESS Tool
 This tool toggles the BRIGHT attribute for the current INK and PAPER colours. The result will be the same as if you selected a BRIGHT colour - attributes will be set when you draw or paint on the image.
BORDER Colour Tool
 This tool allows you to specify the border colour of the image. This only applies to the output .TAP file - the colour chosen will be set as the colour displayed using BORDER when loaded into an emulator or a real Spectrum. Important - this setting should be recovered in a future load (it’s looking for the bytes for BORDER n where n is a number between 0 and 7). This is experimental for the moment.
Tracing Image Tool
 This tool allows you to resize, position and change the opacity of the tracing image. Click and drag on the image to move it about. At the bottom right corner, you will see a small control that will allow you to resize the image. The slider in the window below the drawing area allows you to control the opacity of the image.
Flood Fill
 This will fill an area bounded with with pixels using the selected pattern. If the pattern is the solid Black one, the following logic will be applied to the fill: If you click on a blank PAPER area, the pixels will be turned ON, with the boundary of the fill being defined by pixels that are ON. If you click on a pixel that is ON, the flood fill will turn pixels OFF with the boundary of the fill being defined by pixels that are OFF.
Patterns
Patterns are set using the Pattern tool (by default a black square). Click  on this to select a fill pattern to use. The tool will be replaced by the new pattern. This defines the appearance of fills using the Flood Fill tool and the pattern used by the Drawing tool in sizes larger than 1 pixel. The default(black) pattern will apply a special logic to the fill that is detailed above.
Undo
 This will undo the last drawing or painting operation. It’s experimental, but hopefully it will undo what you want!
Preview Pixels
 This tool (which is to the right of the drawing area) will let you switch PAPER off, so you can see just where the pixels are. Some artwork requires a mixture of adjacent INK and PAPER coloured attribute blocks to give the appearance of a solid covering of colour. This can help you determine where these boundaries are.
Show Tracing Layer
 This tool (to the right of the drawing area) displays the tracing layer, which you can use as a guide for drawing. This is a toggled control, so clicking it again will hide the tracing layer.
Show Grid
 The Grid can be shown or hidden by toggling this control. I found that the 8x1 attributes mode looked really odd with the grid on. While it’s a handy guide for attribute layers, the grid can interfere with the look of the image when the blocks are small.
Magnifier

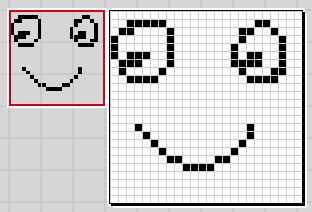 This tool opens a draggable “loupe” on the art-working area. It shows you the state of each pixel in the small red bounded box in a larger box (colour information is displayed in this larger box, but not BRIGHT versions). The larger box allows you to toggle the state of individual pixels by clicking on them. Dragging the “loupe” allows you to magnify other areas of the artwork area. This is functionality is experimental and could change significantly in the future.
Output PNG
 You can get a PNG image of your creation. Click on the icon, and a window will open with your creation rendered as an image. Click the Save button to download the image to your Downloads folder, or right click on that to save it. Depending on your machine, the time it takes to create this image will vary. It’s not instant, but it’s pretty quick.
The image will be presented at a fixed size. To rescale it in an image editor and retain the sharp pixel look, scale it without using any interpolation settings (this is where the image editor will start to blur pixels). Make sure to scale using a factor (1x, 2x, etc.). Scaling to a target resolution may cause the resulting image to lose its sharpness. Eventually, I’ll look at allowing you to output at varying sizes.
Save a File
 You can save a .TAP file. This includes a small loading BASIC program, as well as the image saved in SCREEN$ format. You can open this file in a Spectrum emulator that supports this format, and the image will be displayed without the usual 0/0 status message when loading is complete. You should be able to convert this .TAP file to an audio stream to play into a real ZX Spectrum.
You can also choose to save the file as a .SCR or .SHC file, which is a raw dump of the screen data. I was asked about this by some Spectrum Next people. A Next should load tis file and display the image without a status message. It won’t change the border colour, and this app will not re-load the data. This is a “one way” format. The .SCR file is for regular “classic” Spectrum screens, the SHC format is for the 8x1 attribute images. SpeccyArt will choose the appropriate format for you.
Load a .TAP File
 You can also load a .TAP file that you have previously saved with this app. Click the icon, and a window will open. Use the form element to locate the file and select it. The file will then be load, and will be made ready to edit. You can also open .TAP files created by the iOS application Retrospecs.
It is also possible to drag and drop the file from your computer’s folder window into the Load window or onto the art-working canvas, where it will be instantly loaded.
Important: you can not re-load a .SCR or a .SHC file. There is data embedded in the BASIC loader which is used when loading the file (currently BORDER colour data, but I may add other information in the future).
Load a Tracing Image
 This control opens a file window which lets you import an image from your local drive to display in an overlay layer on the drawing window. This allows you to “trace” images.
Tip Jar
I hope you like this - and find it useful. It’s been a lot of fun to make, and it’s here for you to play with. If you do like it, then please consider a donation to the "fighting fund". This will help offset costs, such as hosting fees, or supplying me with my brain fuel - tea (which my sister proudly tells her friends is what my imagination is powered on!). Your support will be much appreciated. You can bung me a quid, a fiver, or more (if you feel so inclined) to me via my PayPal account. Thank you!
Version Log
0.12b - Support for Spectrum Next screen mode with 8x1 attribute blocks. This includes saving and loading .TAP files, and exporting to the .SHC format.
Grid can be toggled on and off using a button next to the drawing area
New menu options in File for supported screen types
Menu option in the Edit menu to convert a Classic Spectrum screen to a Next 8x1 attribute format screen.
Warning window for destructive options - Loading, New
Bug fix for painting tool - also made this a bit faster as a result!
Bug fix for undo after a flood fill
0.11b - Added a border colour tool and updated the loading BASIC program in the .TAP file to display this choice. Retrieving this setting should be fairly robust, but at this moment, I see it as experimental.
Added more fill patterns.
Consolidated some code.
Slimmed down the code that plots pixels by a lot
Added a brightness control tool and re-jigged the UI to accomodate an extra switch at the bottom of the screen
0.10b - Started reducing repeated code - windows and filing mostly
Bug fixes - including diagonal line brush not drawing!
Bug Fix: The diagonal brushes weren’t working
0.9b - Added: better controls to shape drawing
Added: Spray can tool
Added: Undo (which is experimental and may not always undo!)
Changed: Save PNG functionality - the image drawing uses the HTML canvas, so much quicker.
Bug Fix: It's generally FASTER! Much faster! Really much faster! Double-plus speedwise.
0.8b - A few bug fixes.
Added: Shape drawing (lines, squares, circles), Magnifier/Pixel Twiddling tool, drag and drop loading, funky “Spectrum-like” flash bottom left.
Tweaked icons, which are now SVG rather than PNG files.
0.6b - Initial public release
Data and Stuff
While this is available as a website, all the processing and editing is handled locally by your computer and browser. No data to do with your images is sent to the server.
JavaScript is not a compiled language, so it will be slower than a native application would be. With that all said, it’ll be way faster than a real Spectrum would be!
Enjoy this. Have fun. Share your work! Use #SpeccyArt on Twitter if you use that platform!
I’ve used the following applications to build this funky tool:
Freeway
BBEdit
Affinity Designer